WGS ClientX – Client Area & General Settings Guide
Before configuring any of the options below, follow these steps once:
-
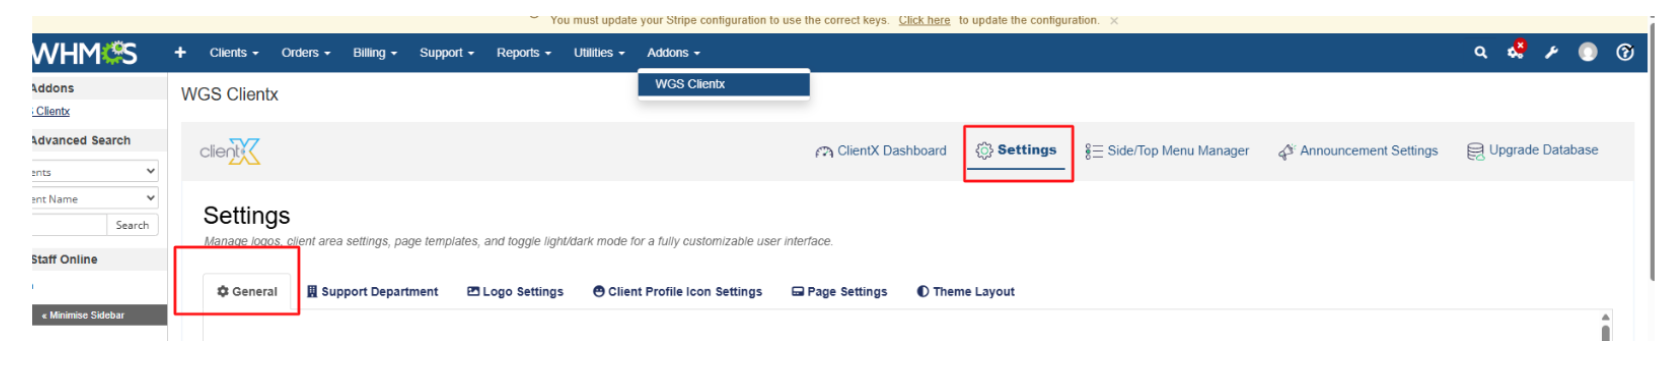
Log in to your WHMCS Admin Panel.
-
Navigate to Addons > WGS ClientX > Settings.
-
Click Settings to open the General tab.
-
How to Disable the Client Dashboard Style from the Client Area
-
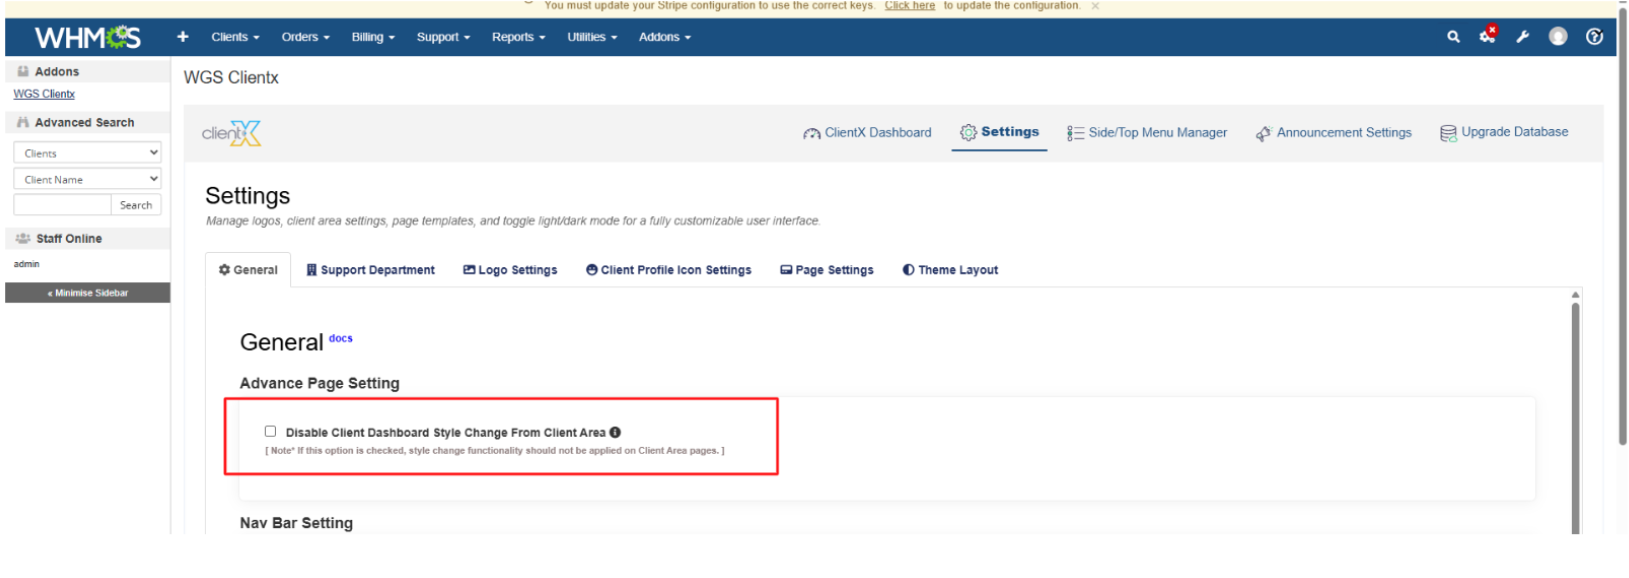
In the General tab, locate Disable Client Dashboard Style
-
Enable this option.
-
Click Save Changes.
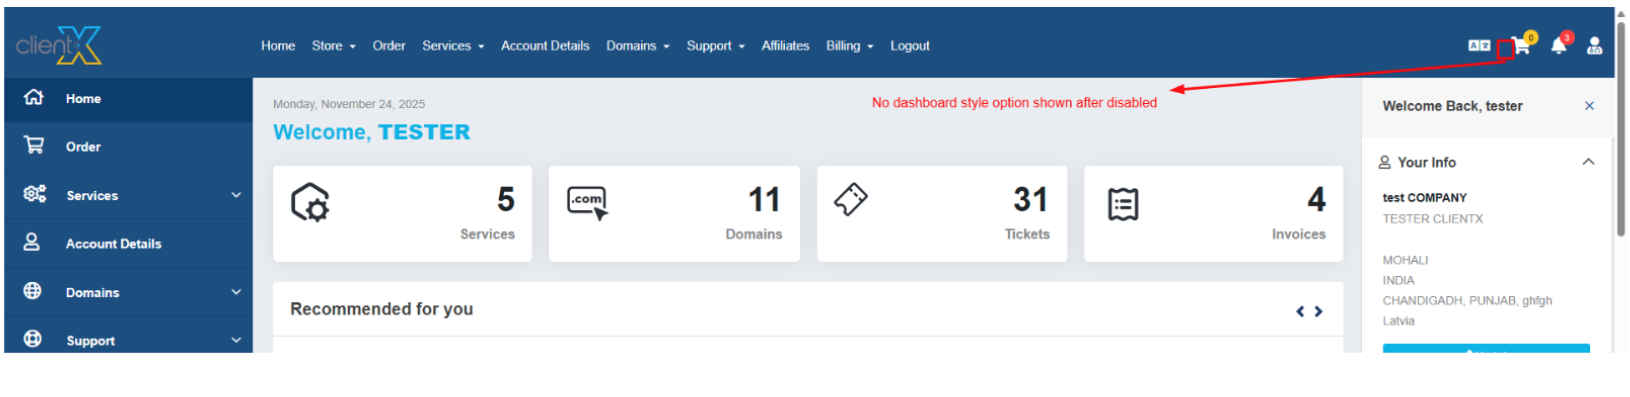
When this option is enabled, the Client Area dashboard style is disabled as shown in the screenshot below.
-
-
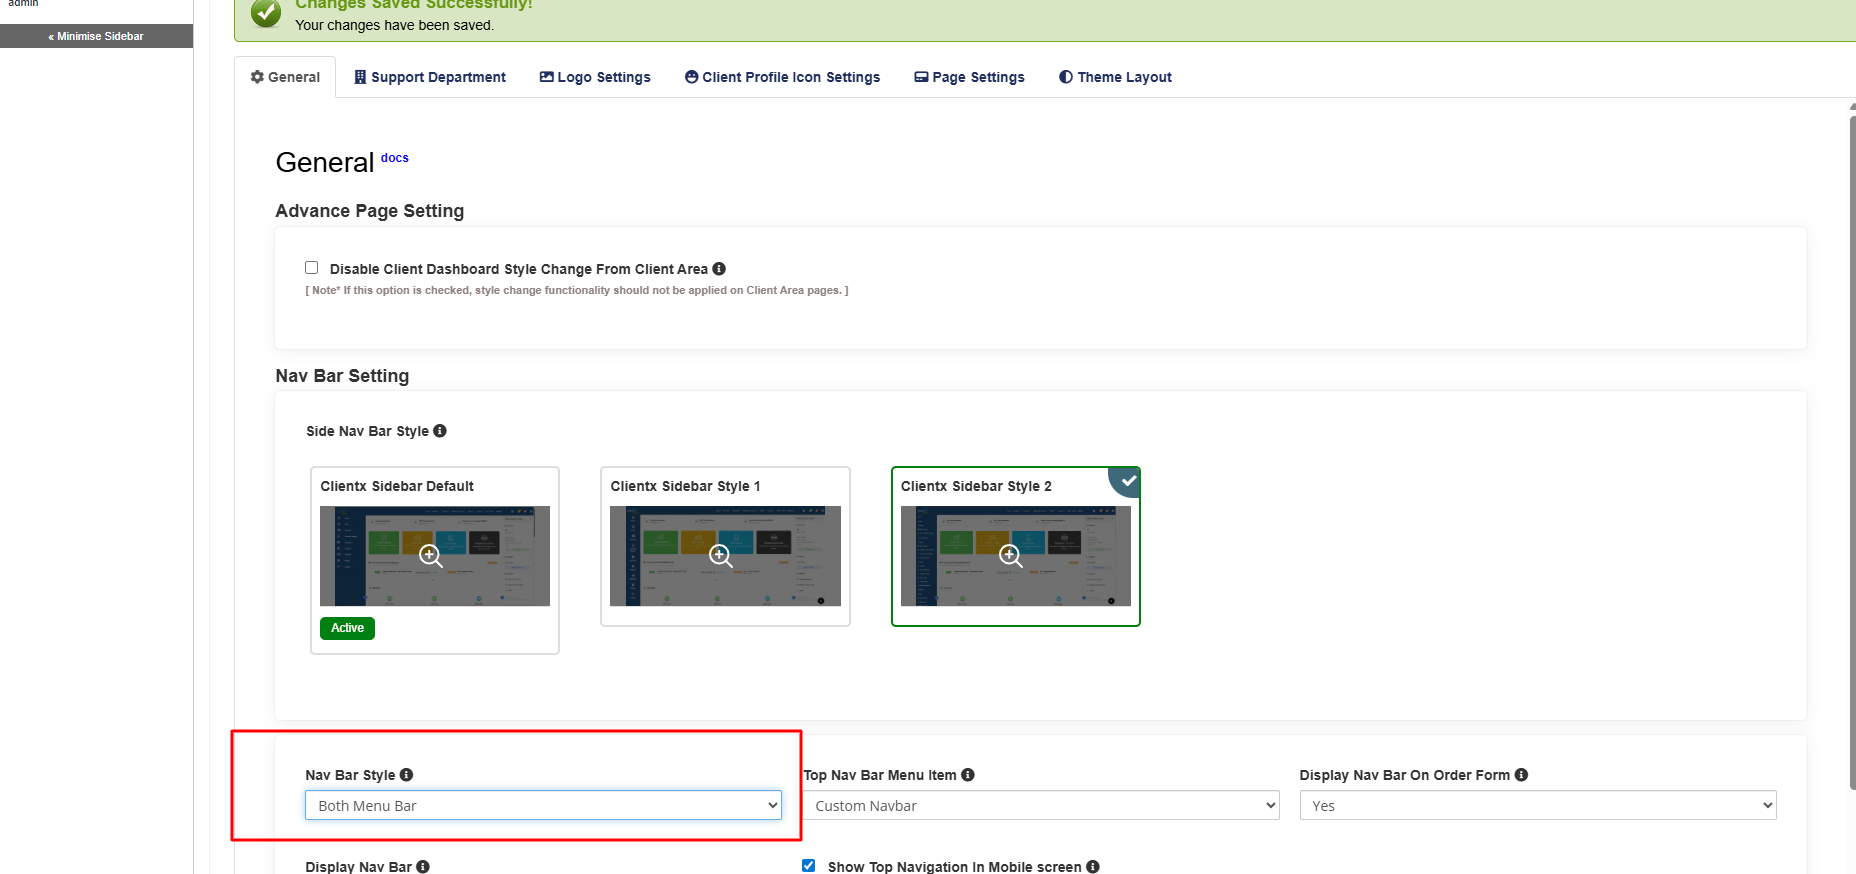
How to Change the Side Nav Bar Style
-
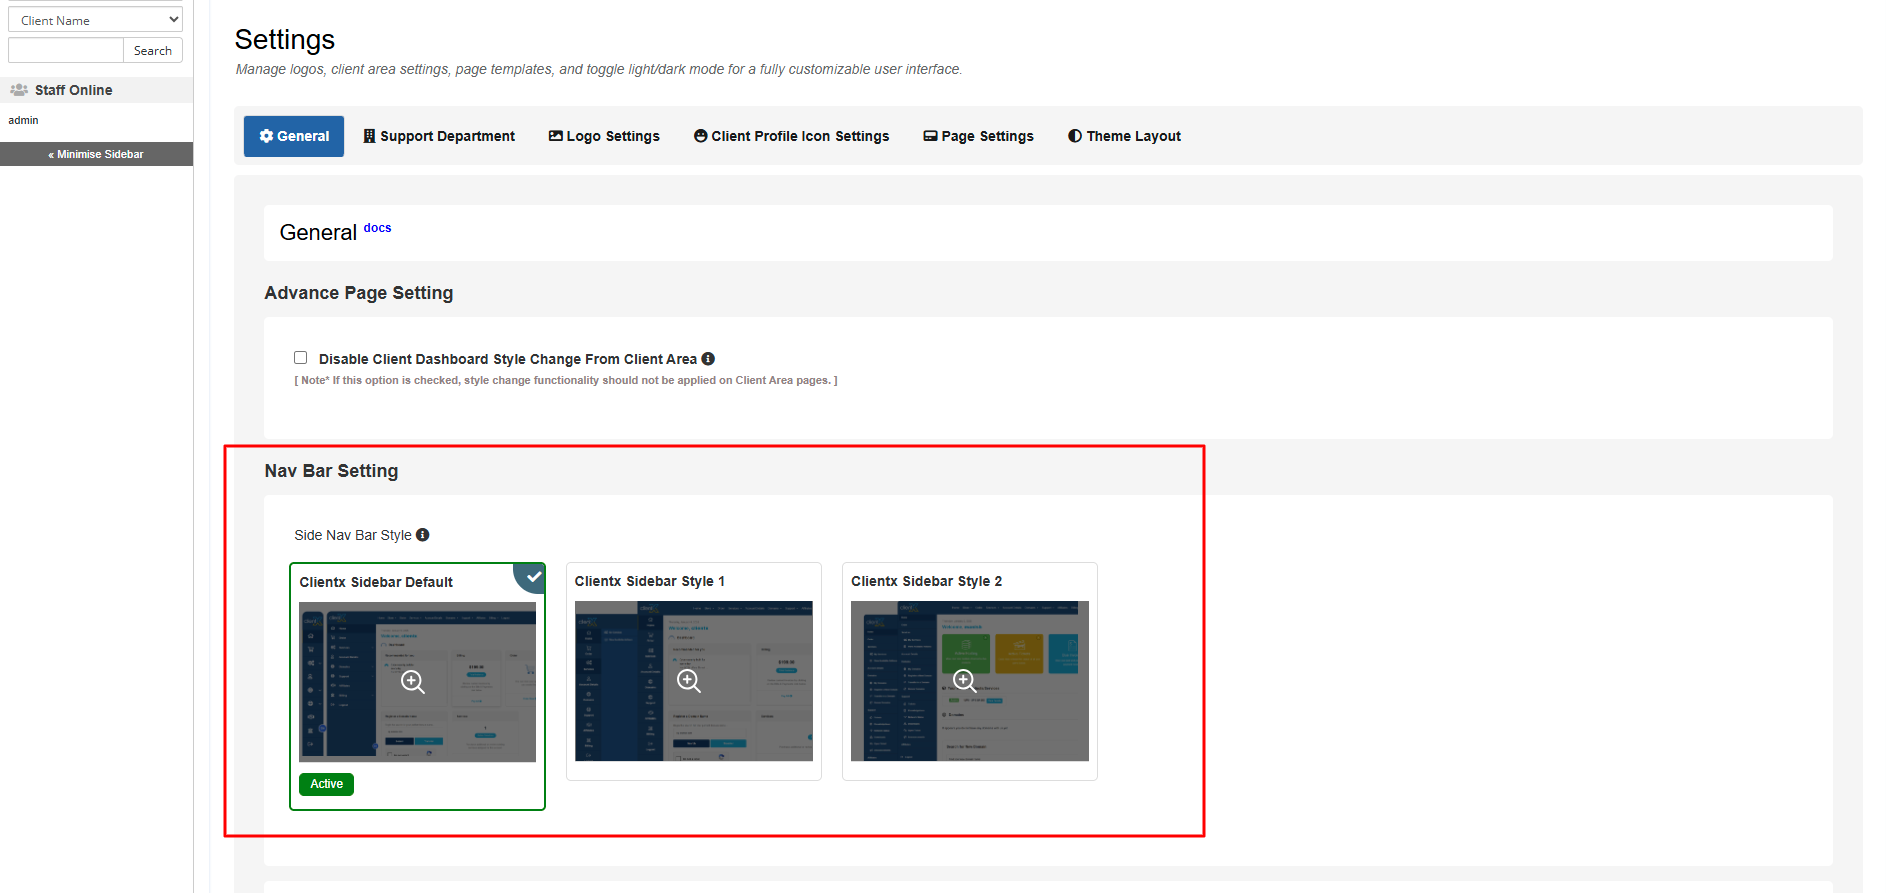
In the General tab, locate Side Navbar Setting.
-
Select one of the available styles:
-
ClientX Sidebar Default
-
ClientX Sidebar Style 1
-
ClientX Sidebar Style 2
-
-
Click Save Changes.
-
-
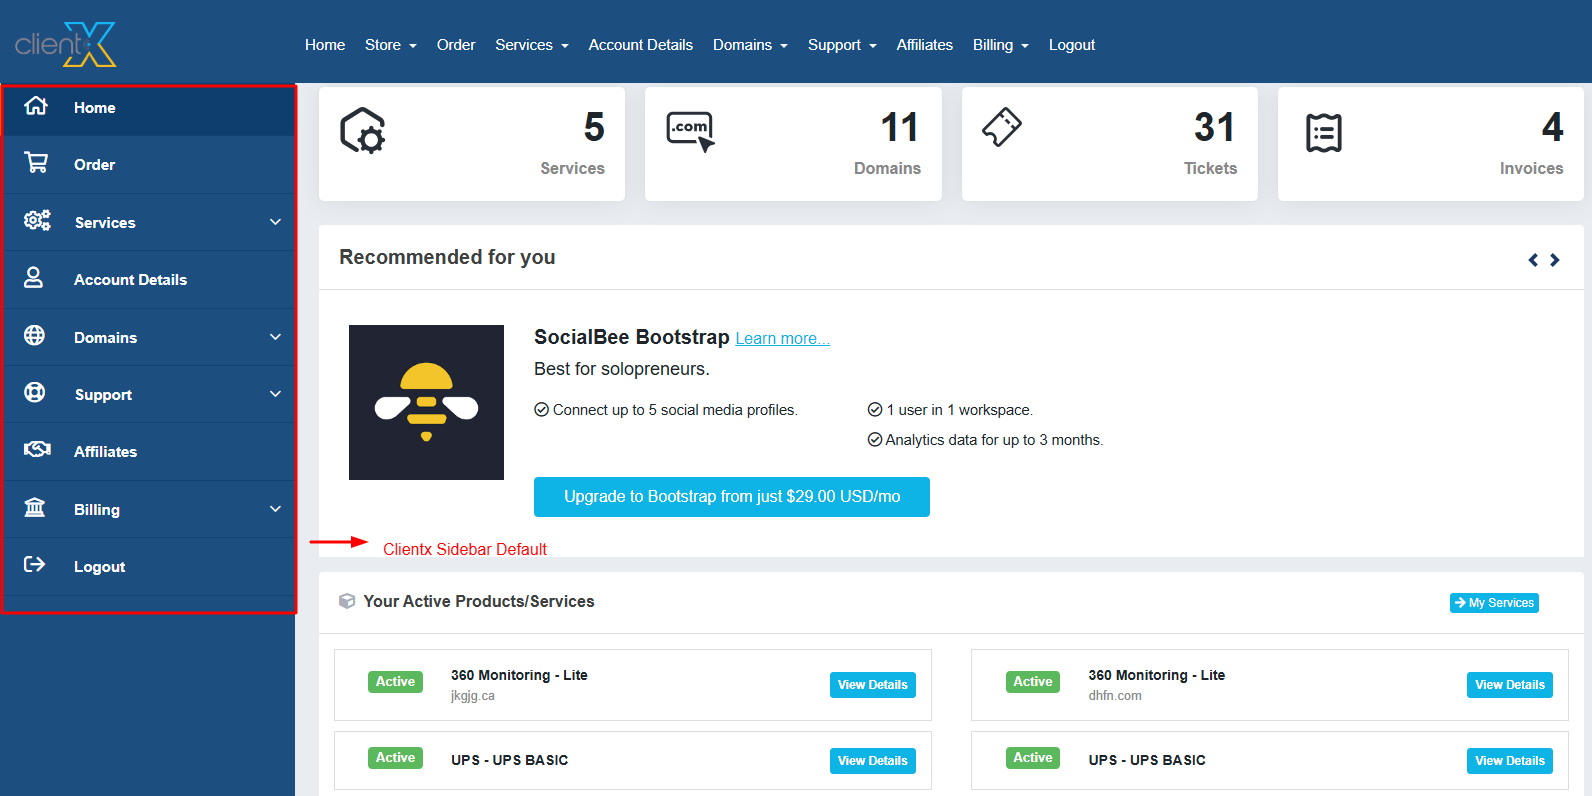
ClientX Sidebar Default
The default ClientX sidebar layout will be applied, as shown in the screenshot below.
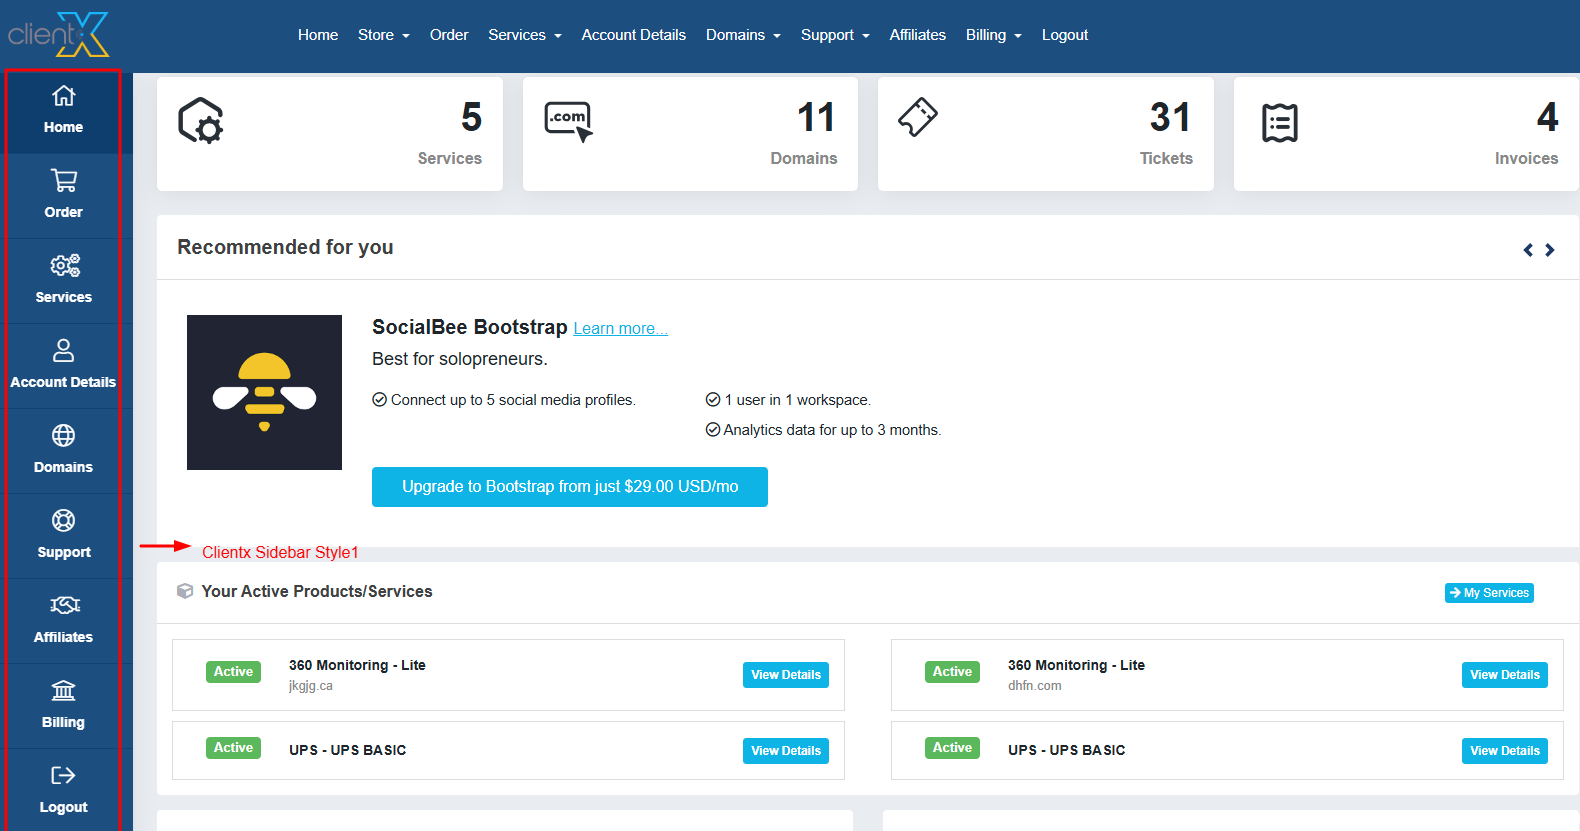
ClientX Sidebar Style 1
Sidebar Style 1 will be applied to the Client Area, as shown in the screenshot below.
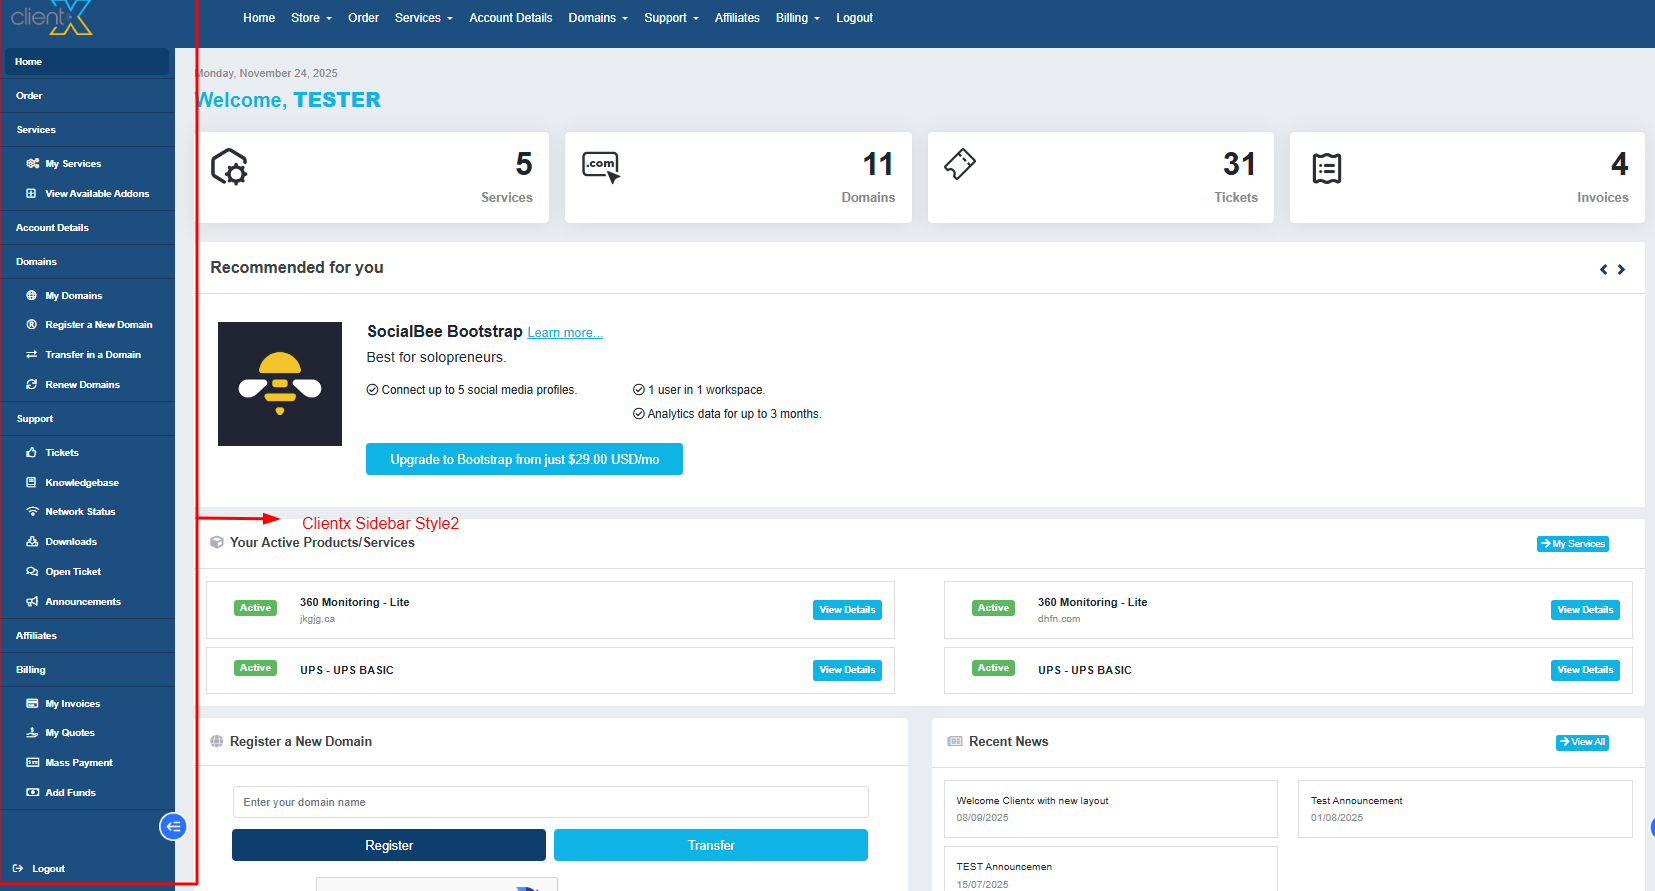
ClientX Sidebar Style 2
Sidebar Style 2 will be applied to the Client Area, as shown in the screenshot below.
-
How to Change the Position of the Nav Bar
-
In the General tab, locate Nav Bar Style under Client Area Dashboard Style.
-
Choose one of the following options:
-
Both Menu Bar
-
Side Menu Bar
-
Top Menu Bar
-
-
Click Save Changes.
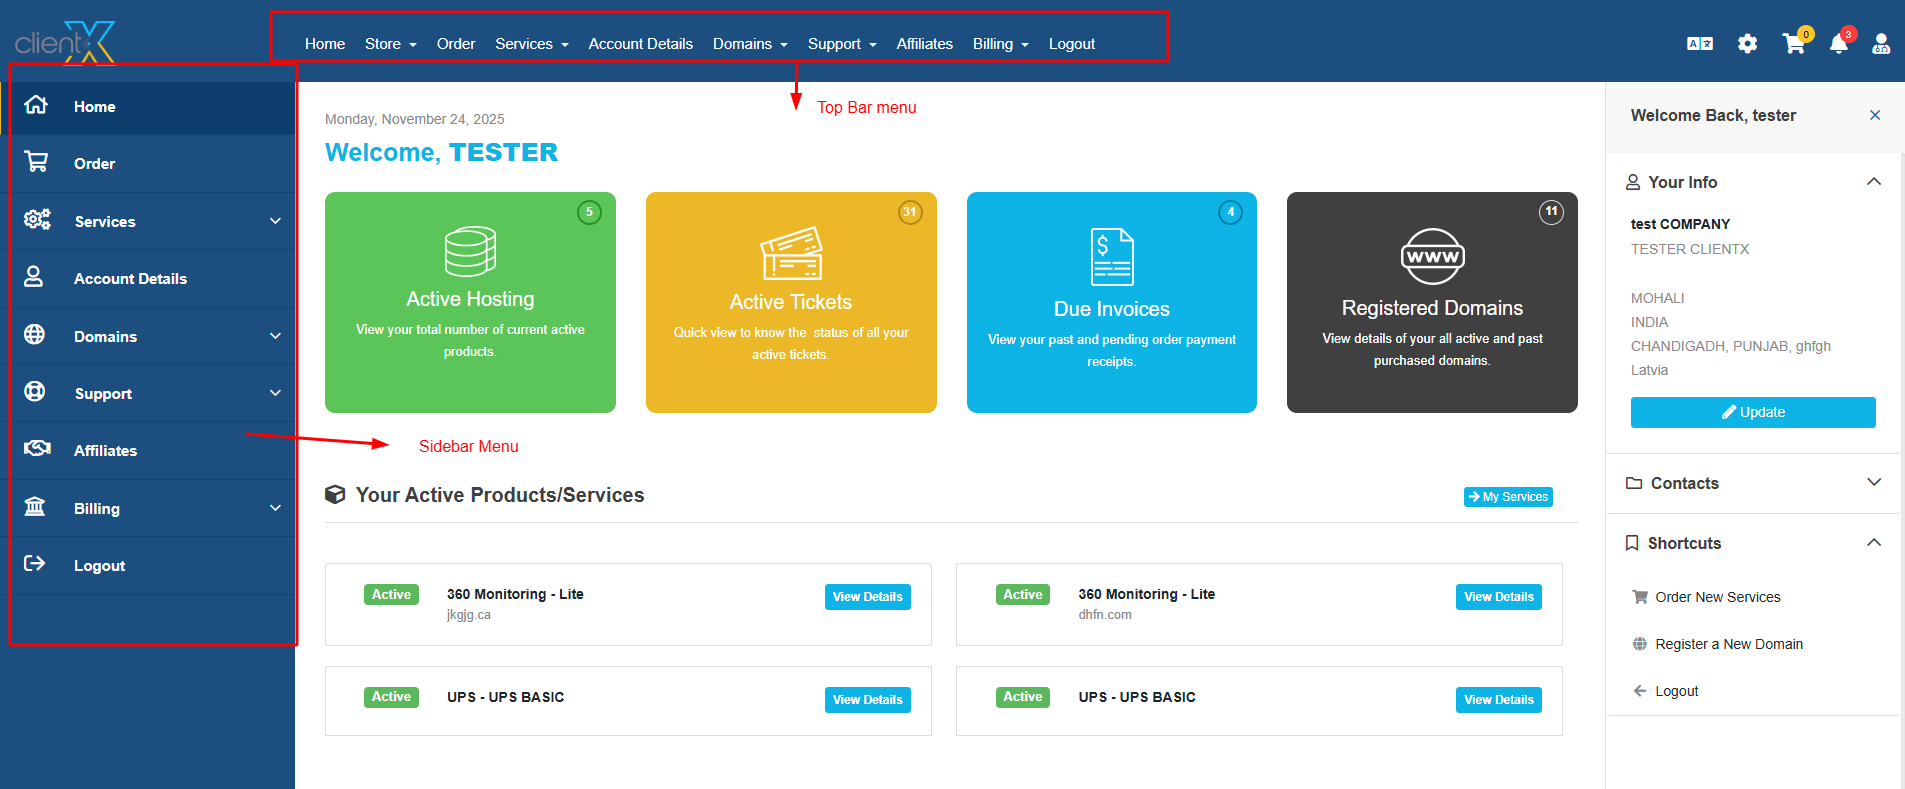
Both Menu Bar
Both the top navigation bar and side menu bar will be visible, as shown in the screenshot below.
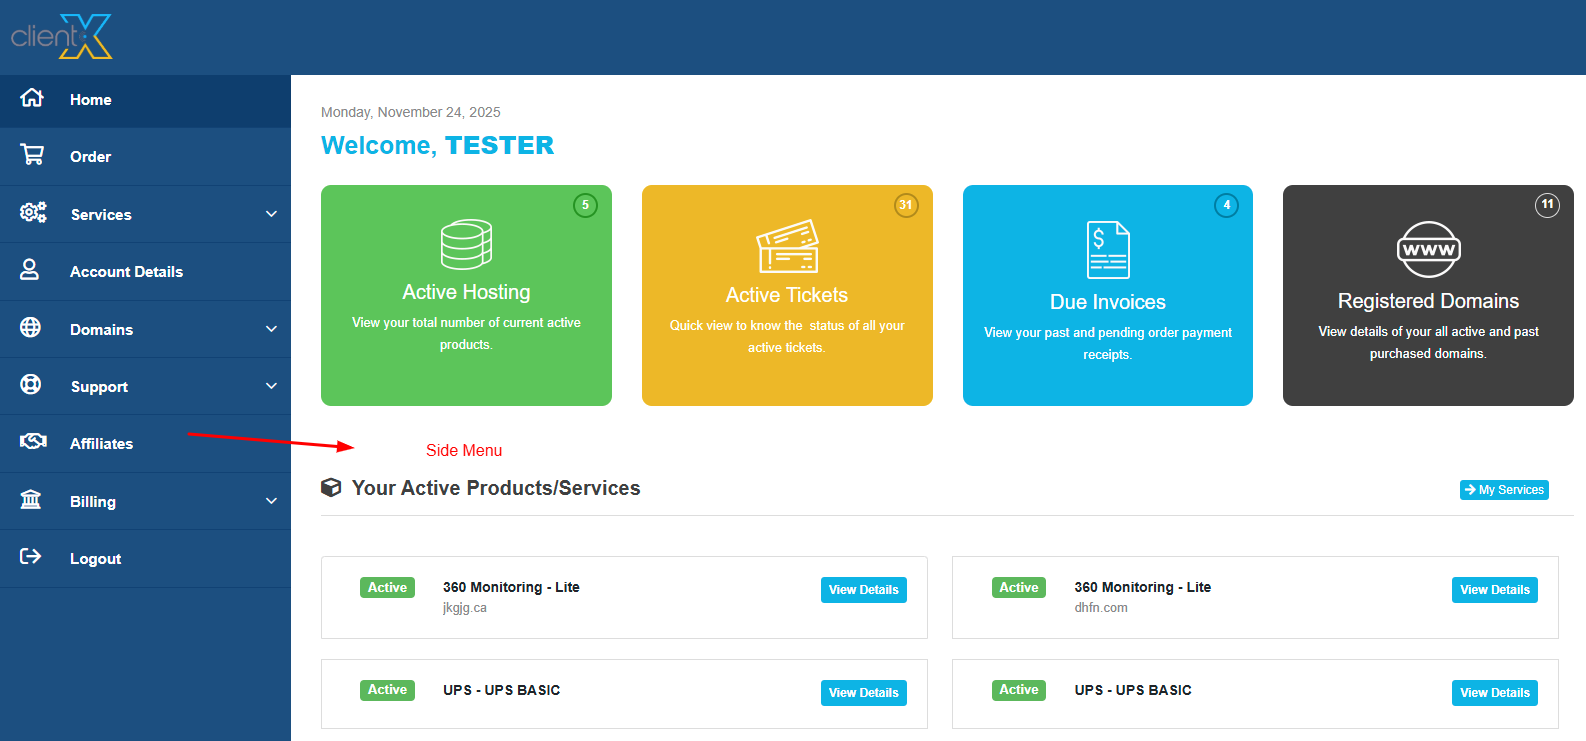
Side Menu Bar
Only the side navigation menu will be visible, as shown in the screenshot below.
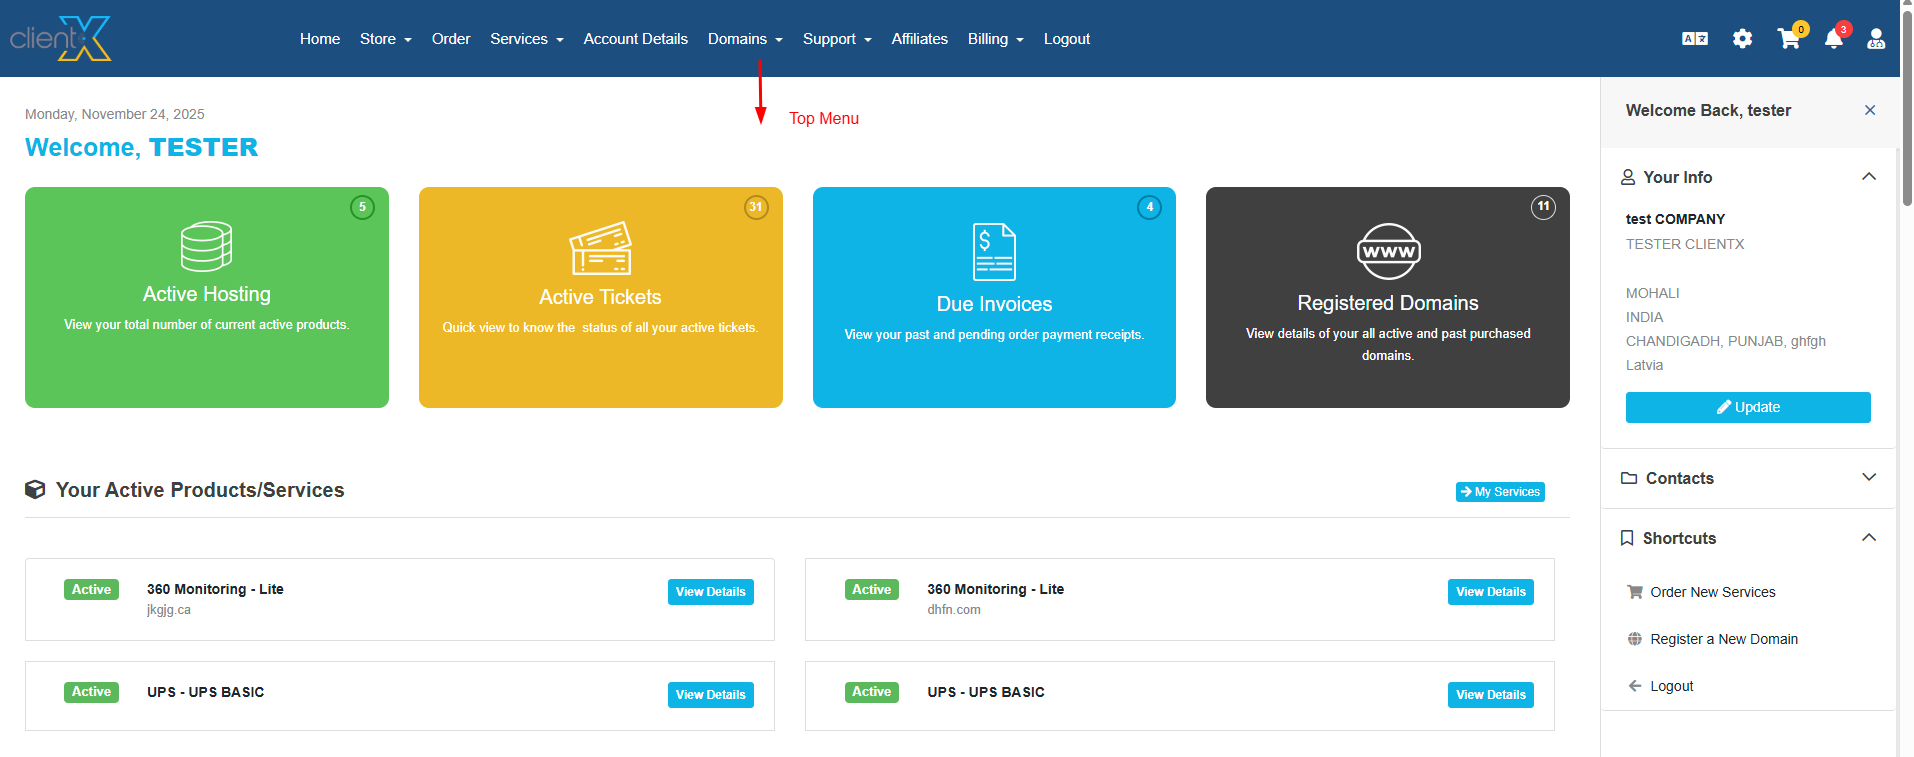
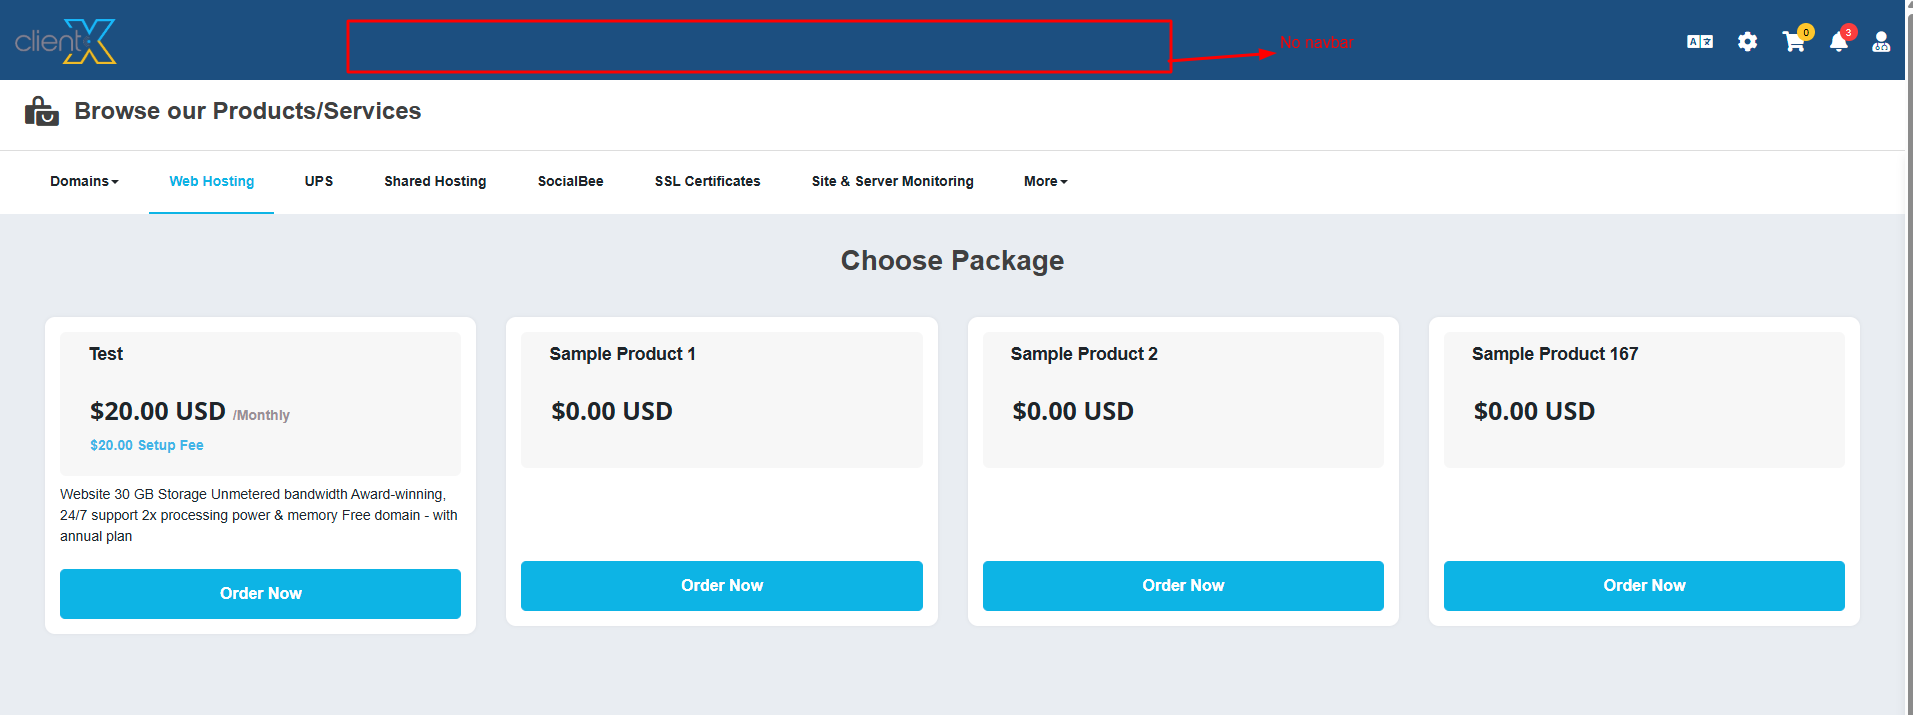
Top Menu Bar
Only the top navigation menu will be visible, as shown in the screenshot below.
-
-
How to Change the Top Nav Bar Style
-
In the General tab, locate Top Nav Bar Menu Item Style.
-
Select one of the following options:
-
Custom Navbar
-
WHMCS Primary Navbar
-
-
Click Save Changes.
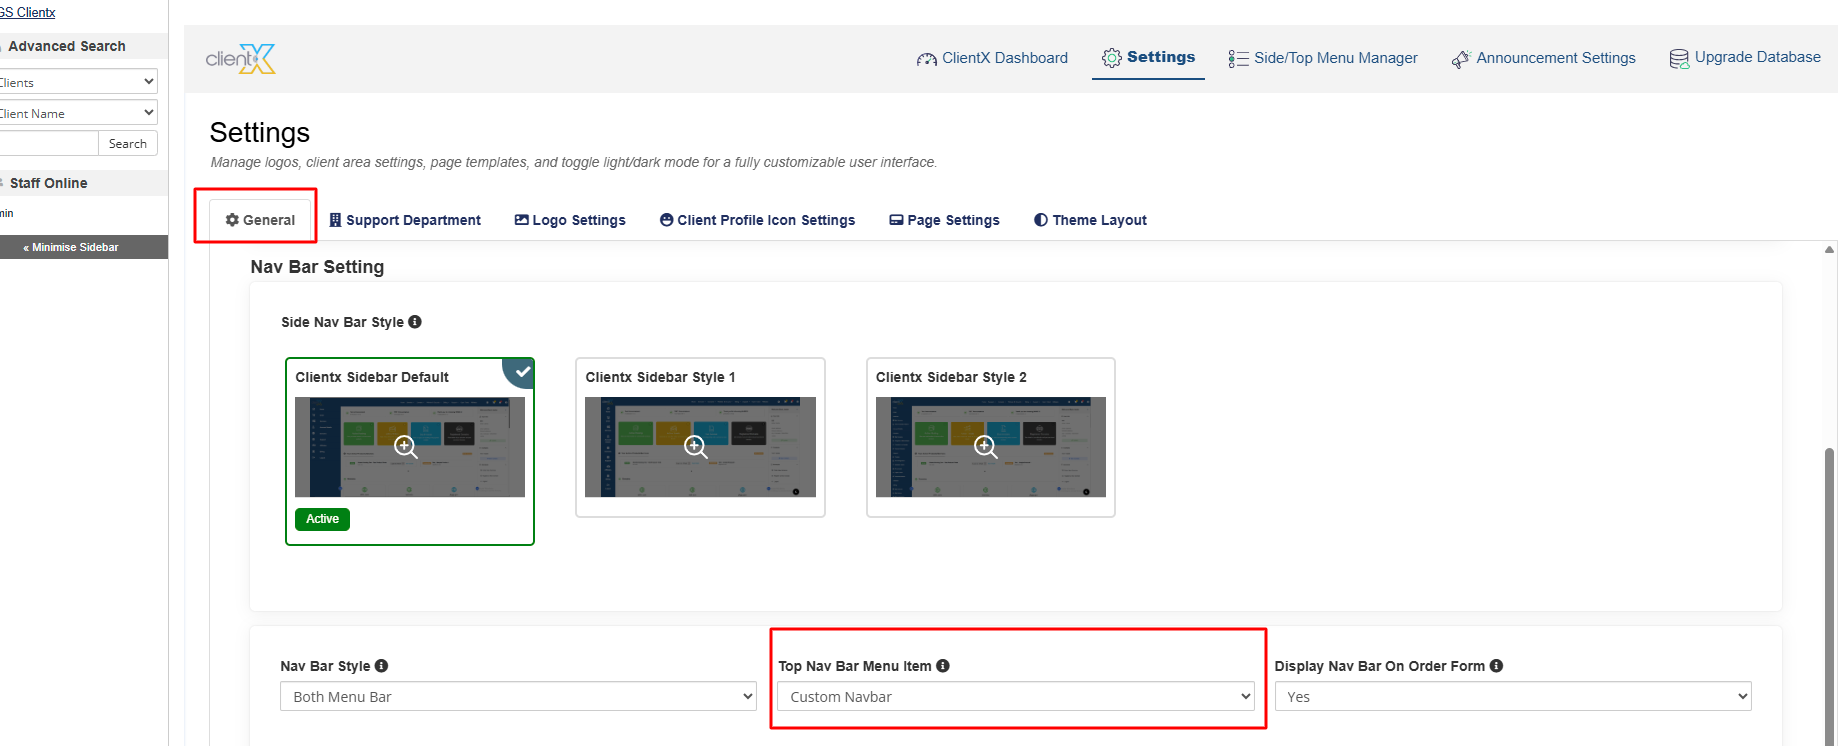
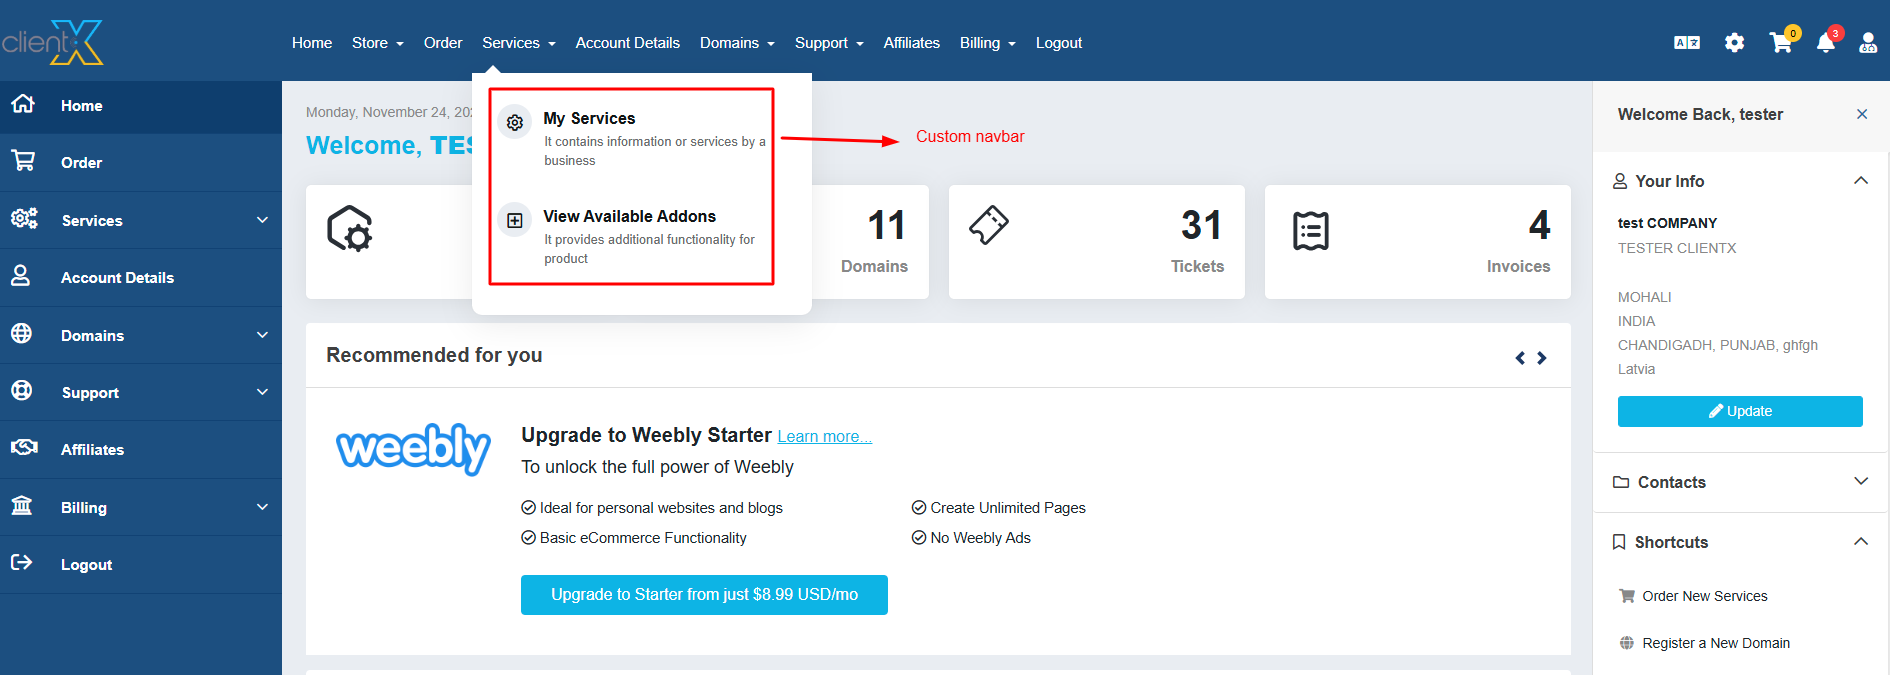
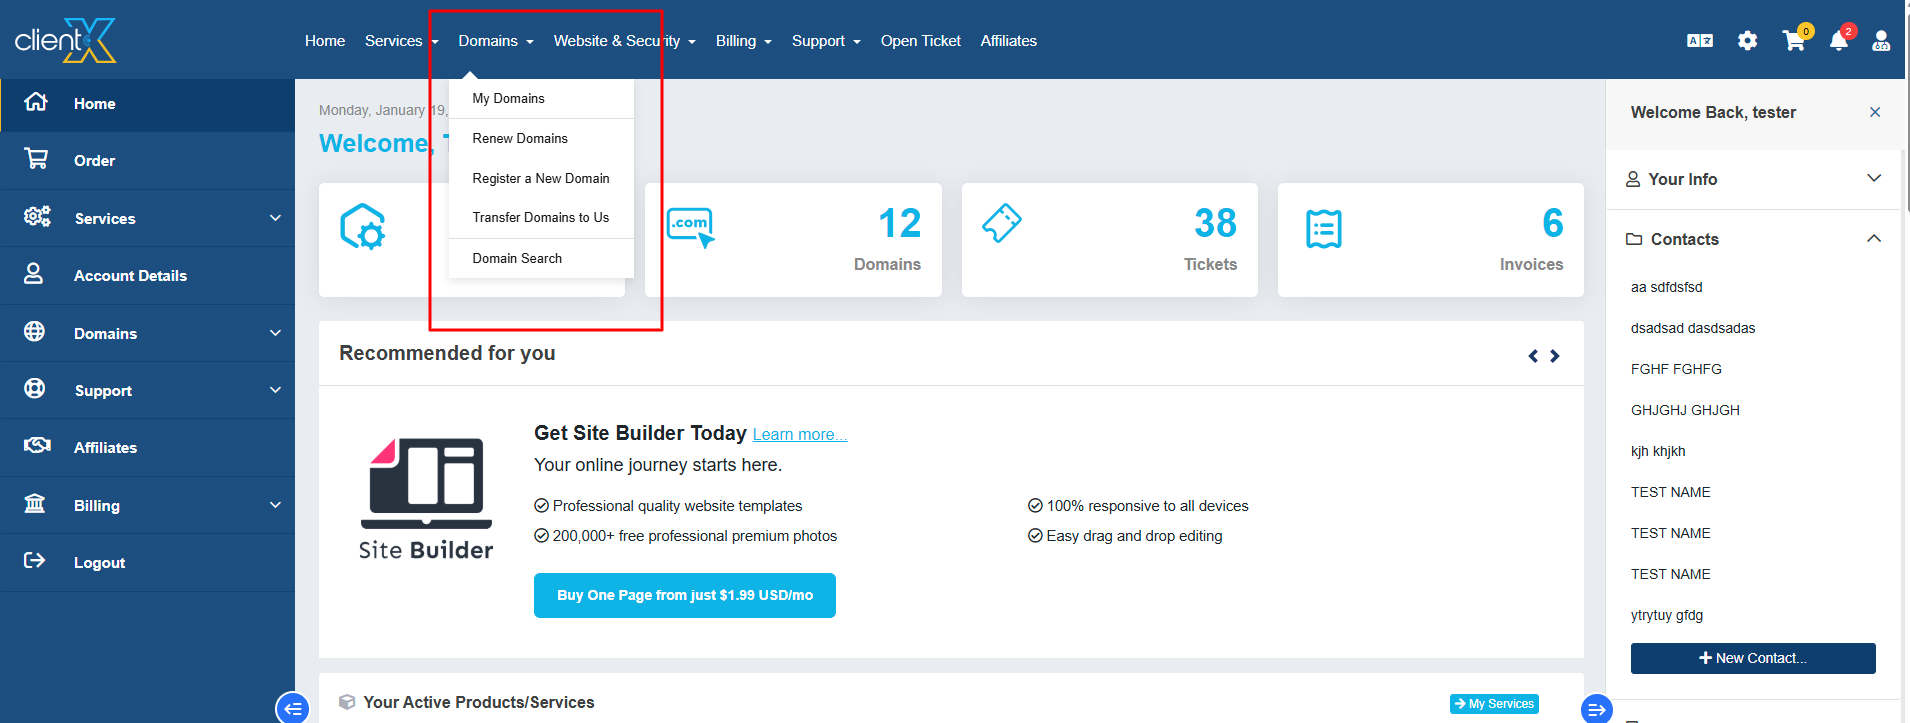
Custom Navbar
The ClientX custom navigation bar will be displayed in the Client Area, as shown in the screenshot below.
WHMCS Primary Navbar
The default WHMCS primary navigation bar will be displayed, as shown in the screenshot below.
-
-
How to Disable the Nav Bar on the Order Form
-
In the General tab, locate Display Nav Bar on Order Form.
-
Select one of the following options:
-
Yes – Displays the Nav Bar on the Order Form.
-
No – Hides the Nav Bar on the Order Form.
-
-
Click Save Changes.
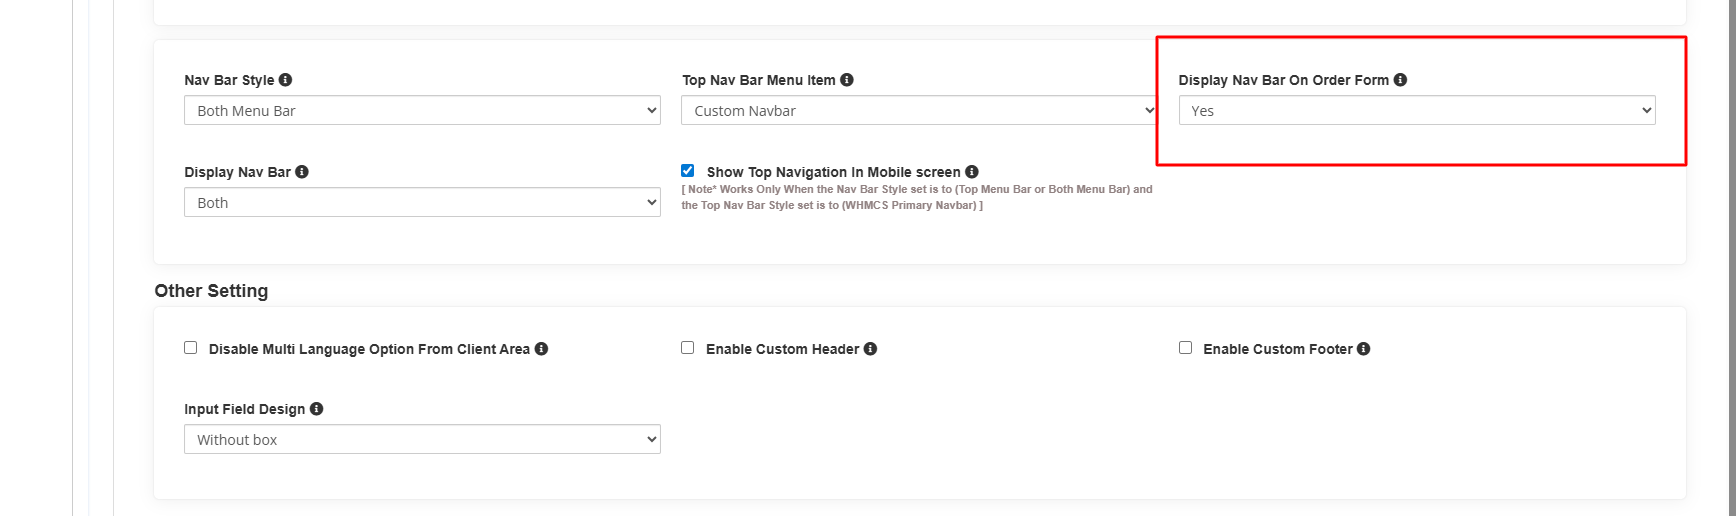
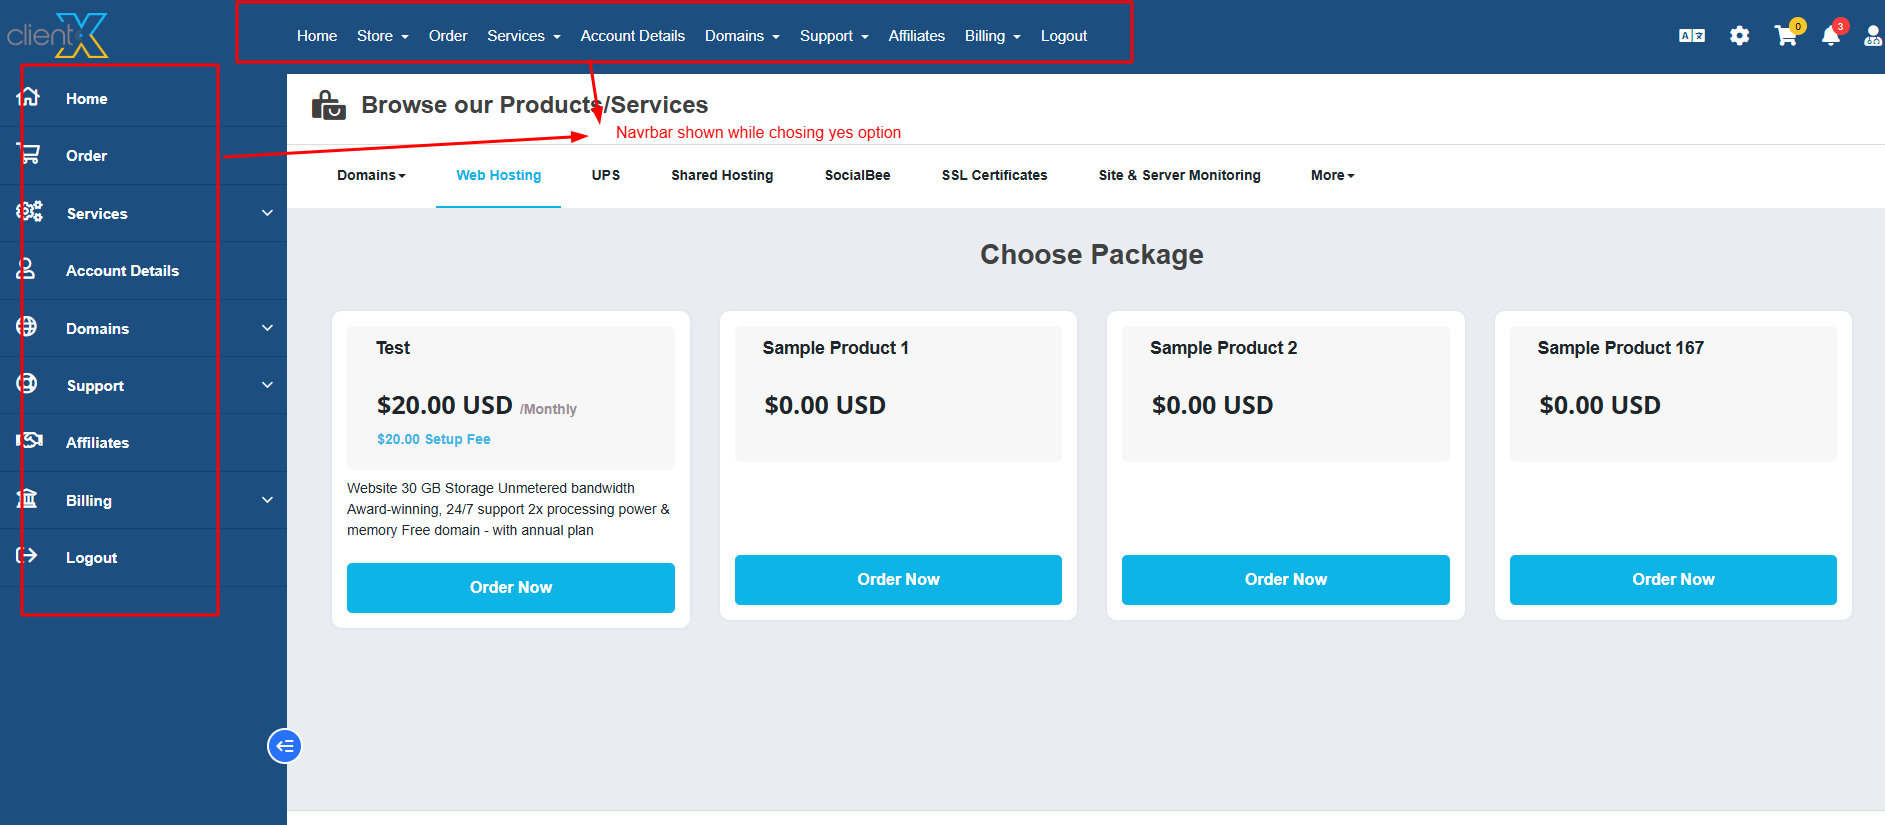
If Yes is Selected
The navigation bar will be visible on the Order Form page, as shown in the attached screenshot below.
If No is Selected
The navigation bar will be hidden on the Order Form page, as shown in the attached screenshot below.
-
-
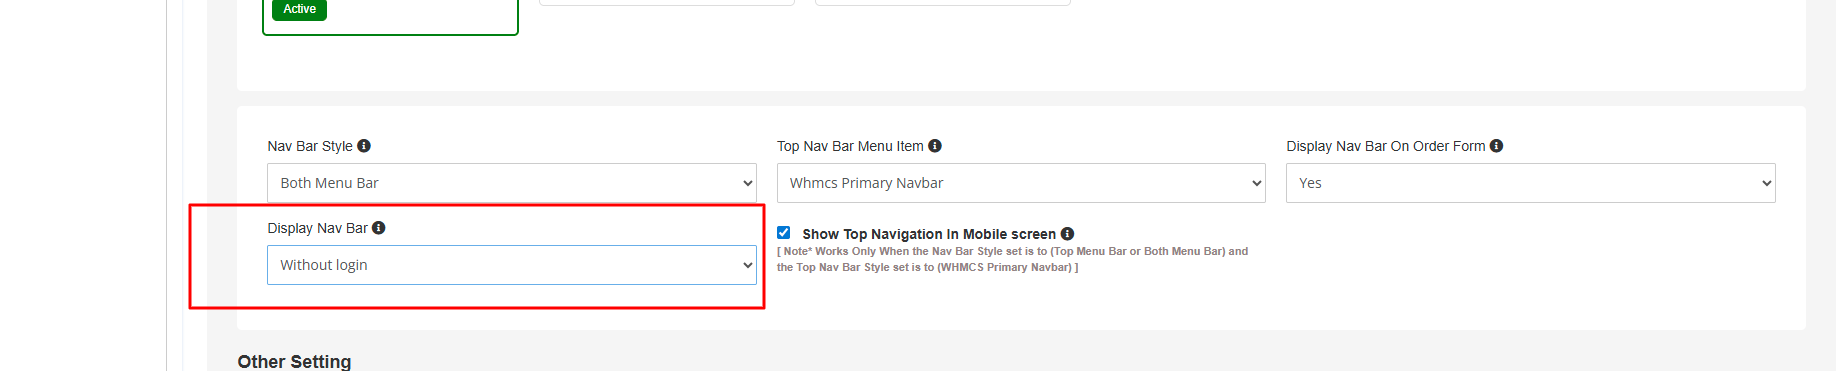
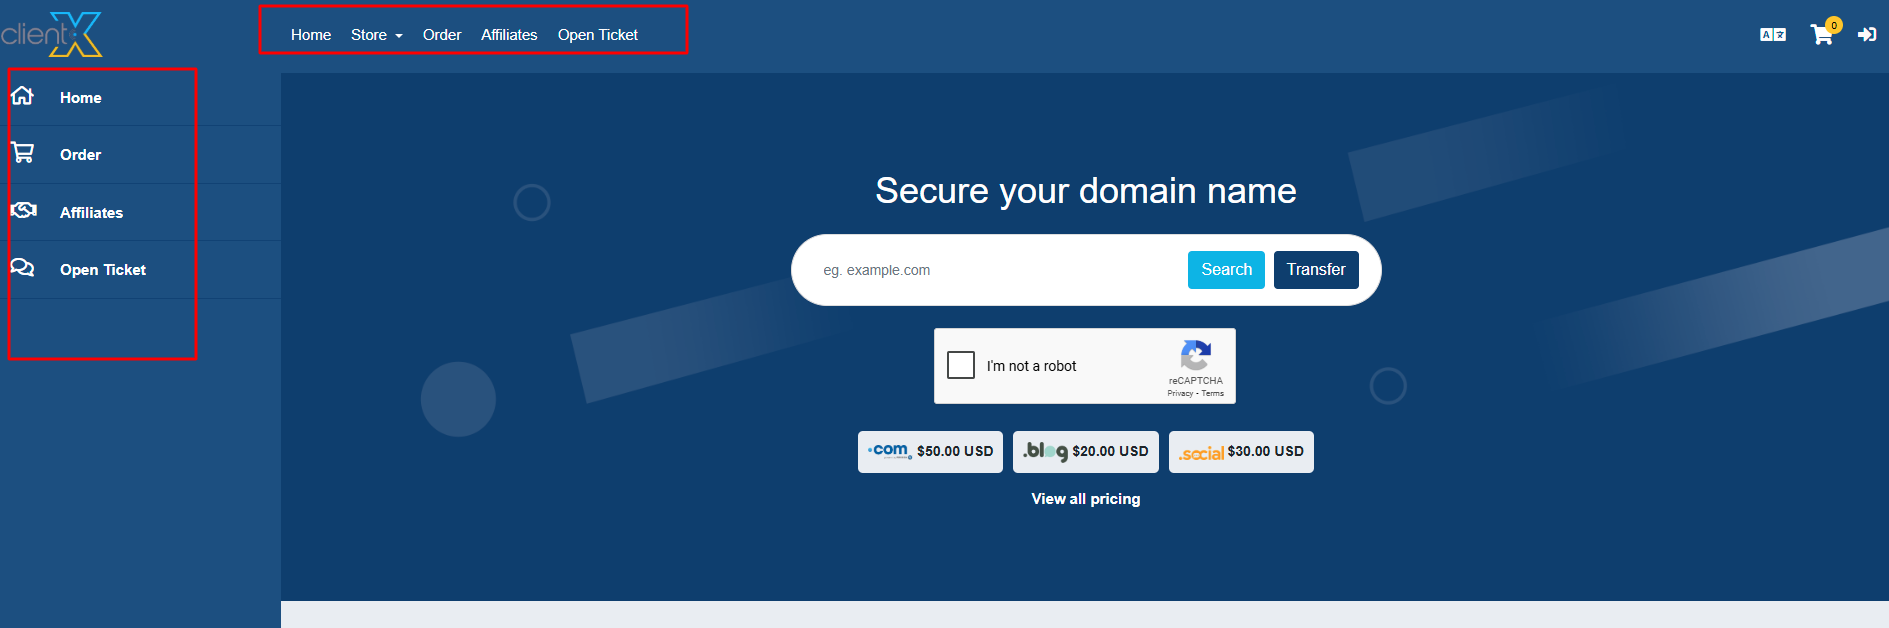
How to Control Nav Bar Visibility for Users
-
In the General tab, locate Display Nav Bar.
-
Select one of the following visibility options:
-
Both
-
Without Login
-
After Login
-
-
Click Save Changes.
Both
The navigation bar will be visible to all users, including guests and logged-in users, as shown in the attached screenshot below.
Without Login
The navigation bar will be visible only to users who are not logged in, as shown in the attached screenshot below.

After Login
The navigation bar will be visible only to logged-in users, as shown in the attached screenshot below.

-
-
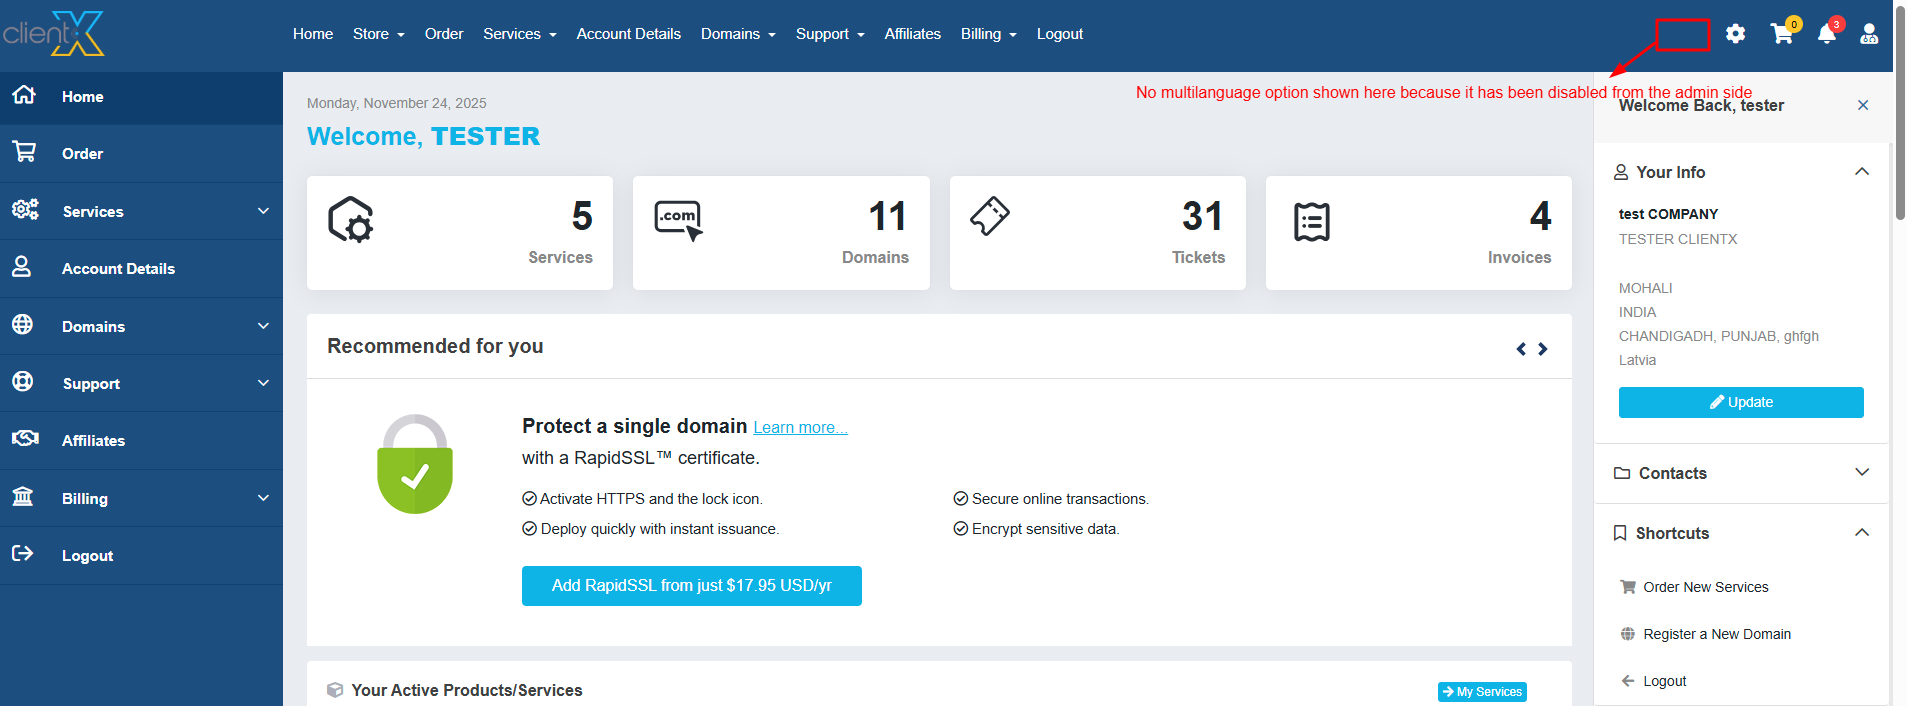
How to Disable the Multi-Language Option in the Client Area
-
In the General tab, scroll to Other Settings.
-
Enable Disable Multi-Language Option in Client Area.
-
Click Save Changes.
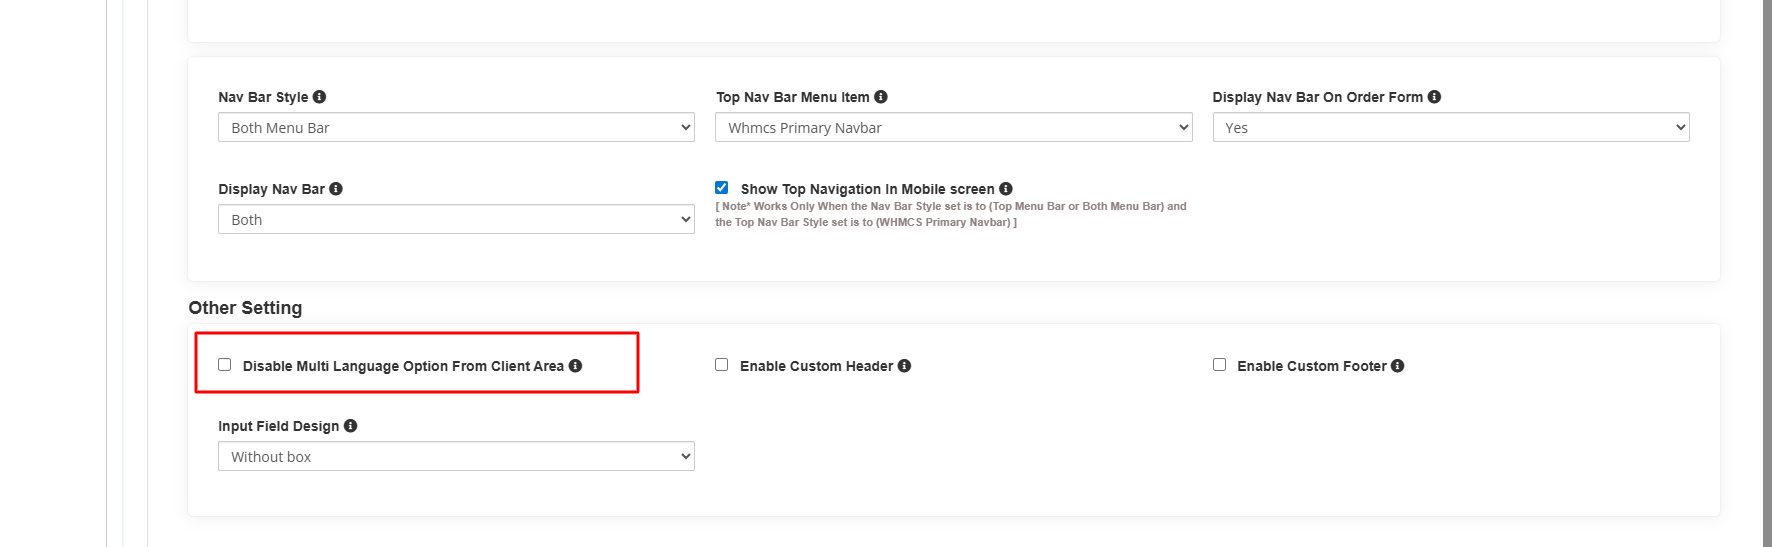
The language switcher will be removed from the Client Area, as shown in the attached screenshot below.
-
-
How to Enable a Custom Header and Footer
-
In the General tab, scroll to Other Settings.
-
Enable Custom Header and Footer.
-
Click Save Changes.

File Configuration-
Open FTP and navigate to:
/templates/clientx-child/
-
Locate the files with the
_newsuffix and rename them as follows:-
custom_header_new.tpl→custom_header.tpl -
custom_footer_new.tpl→custom_footer.tpl
-
-
Edit
custom_header.tpland add your custom HTML.
CSS Configuration
-
Open the css folder.
-
Rename the file by removing
_newso it becomescustom-header_footer.css. -
Add your custom header and footer CSS to this file.
JavaScript Configuration
-
Open the js folder.
-
Rename the file by removing
_newso it becomescustom-header_footer.js. -
Add any required JavaScript code to this file.
The custom header and footer will be automatically loaded on the frontend, as shown in the attached screenshot below.

-
-
How to Change the Design of All Input Fields
-
In the General tab, scroll to Other Settings.
-
Locate Input Fields Design.
-
Choose one of the following options:
-
With Box
-
Without Box
-
-
Click Save Changes.
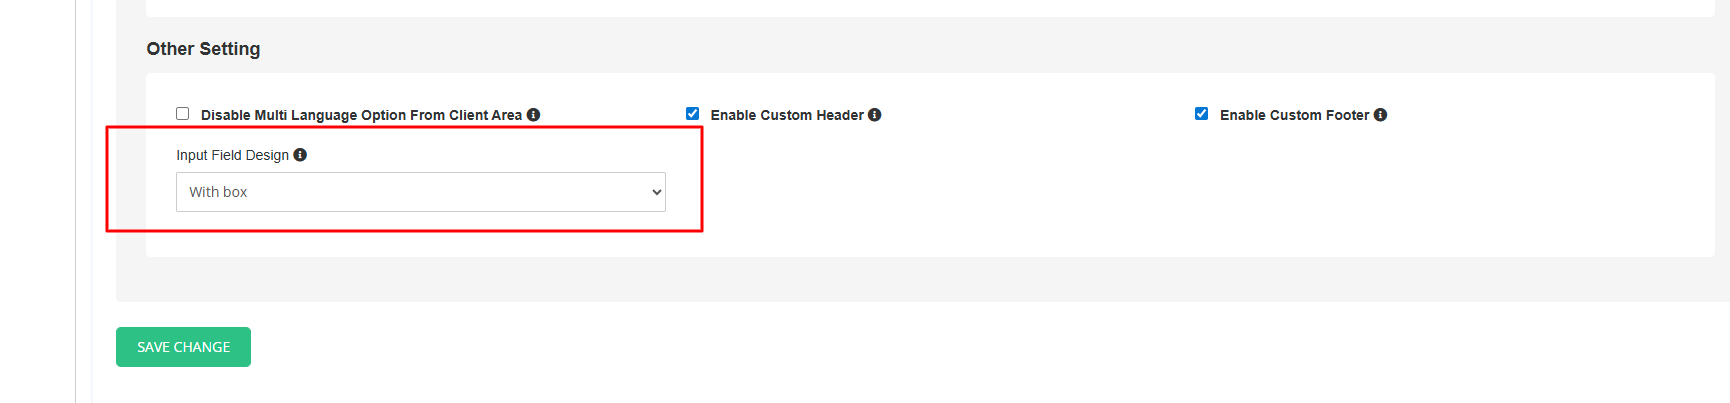
With BoxAll input fields will be displayed with borders, as shown in the attached screenshot below.

Without Box
All input fields will be displayed without borders, as shown in the attached screenshot below.

-
